

Using VST plug-ins on Windows
- Live Versions: All
- Operating System: Windows
VST plug-ins are instruments and effects from third party manufacturers which can be installed and used in Live. VST2 plug-ins use the .dll file extension. VST3 plug-ins use the .vst3 file extension.
How to install and activate VST plug-ins on Windows
1. Download the latest installer file from the plug-in manufacturer's website and run it.
2. Some plug-ins may also have a standalone version which is separate from the VST version. Don't install the standalone and VST versions to the same folder.
3. Install to the VST folder of your choice. Here are some recommendations for existing folders which you can use:
- C:\Program Files\VSTPlugins - 64-bit VST2 plug-ins.
- C:\Program Files\Common Files\VST3 - 64-bit VST3 plug-ins. (Live 10.1 and later).
- C:\Program Files (x86)\VSTPlugins - 32-bit plug-ins.
Note: Live 10 is 64-bit only, so 32-bit plug-ins won't appear in Live 10. Likewise 64-bit plug-ins won't appear in 32-bit versions of Live.
4. You can instead install the VST to a custom folder.
5. Once installed, launch Live.
6. Open Live's Preferences → Plug-ins (Live 10.1 and later)/File Folder (all Live versions until 10.1) → Plug-In Sources.
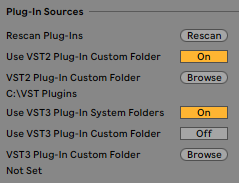
7. Activate either the Custom folder or System folder (VST 3 only) as required.
Note: only add discrete folders which contain VST plug-ins. Adding entire drives or system folders may crash Live. Make sure that the folder contains only VST .dll files. Other system files can use the .dll extension too, but they may crash Live if included in the VST folder.
8. Live scans all available plug-ins and once completed they will show up in Live's browser under the Plug-ins category.
9. If you've installed the plug-in correctly but it's still not appearing in Live, see our dedicated article: VST/AU plug-in doesn't appear in Live.

-
-